Chat Bot
QBot Builder app can be used to integrate Telegram, Viber, and WhatsApp chatbots into Euphoric with the help of QBot.
1. General interface

The list on the left (1) shows the companies certain bots are assigned to.
The general list in the center (2) contains all bots included in the selected company displayed on the left.
The Euphoric user can either view or edit the bots according to their level of access in a certain company that uses a bot (regular/leader/newbie).Only a Leader can create and edit bots.
Both Leader and Regular can view created bots. Newbies cannot access this section. You can change the Euphoric user access level in the Teams and Users sections.
2. Creating and editing the bot
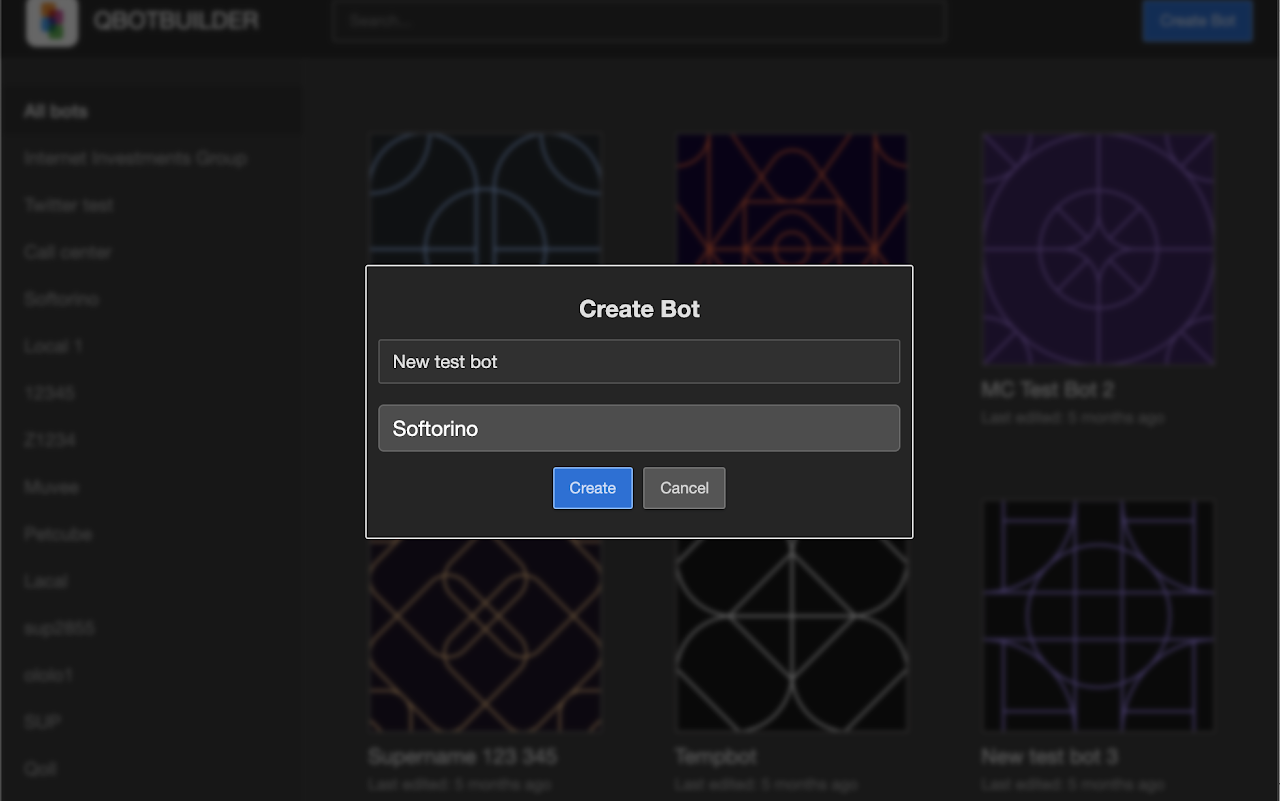
A window for naming the bot and assigning it to a company will open after a user presses the Create Bot button.
2.1. General information
QBot consists of Dialogues. Dialogues, in turn, are made up of Nodes. Each node represents a message. A dialogue is a collection of messages.
A dialog has a name and a command that initiates it. While interacting with a bot, a user can start a dialog by manually typing a command, or by clicking the corresponding button.
When a message is sent to a bot as a command (for example, /start), the first node of the dialogue is sent. The next dialog node is then sent in response to each new user’s message until the next command is received (for example, /help).
To initiate the next dialog, a user must click the reply button with their command (for example, /help), or enter the name of the command manually.
2.2. Bot settings
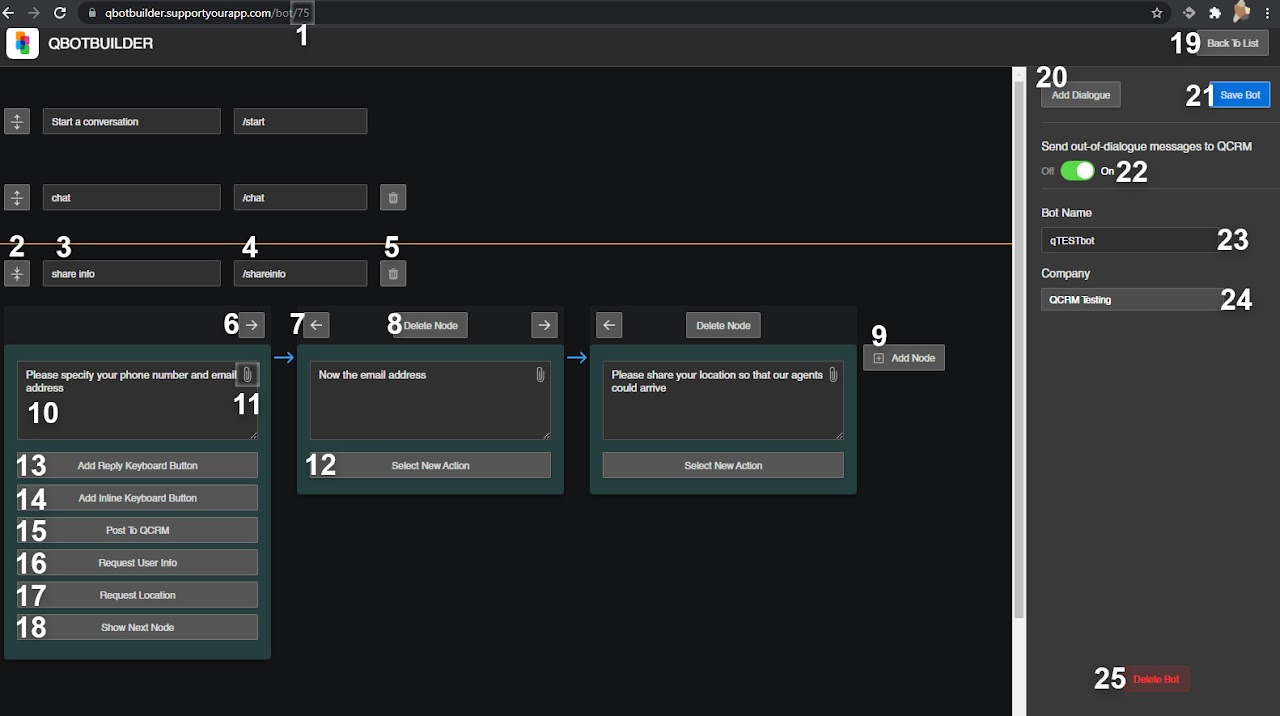
Main window:
- QBot ID. An ID used to integrate Euphoric with an external chat using QBot.
- Open/close dialogue nodes settings.
- The name of the dialogue.
- A command for calling a dialogue. A new dialog is initialized when a command associated with the dialog is sent in the chat message input field or by clicking the corresponding response button.
- Remove the dialogue.
- Shift the node to the right.
- Shift the node to the left.
- Delete the node.
- Add a node.
- The text of the node that will be seen by a user.
- Attach a media file to the message.
- After pressing the Select New Action button, the following list of actions opens:
- Add Reply keyboard button. The buttons replace a regular alphanumeric phone keyboard.
- Add Inline keyboard button. The buttons appear under the message they belong to. It only works with Telegram. Viber transforms the Inline Keyboard into a regular Reply Keyboard.
- Post to Euphoric. Send all answers in the current dialogue to Euphoric in the form of a ticket.
- Request User Info. Request user info for identification (more about it in the item 3: Customer data inquiry).
- Request Location. Send a user a button for providing information about their location. Does not work in PC versions of messengers. The location will be sent in the form of Google Maps link.
- Show the next node. Allows users to automatically go to the second node of the dialogue after a certain time has elapsed. The time is set in milliseconds in the form of 1000 ms — 1 sec.
- Right-side panel:
- Come back to the general list of bots.
- Add a dialogue.
- Save QBot.
- Send out-of-dialogue messages to Euphoric. When enabled, each new dialog a user enters will be returned to the dialog ticket log. This will help an agent understand at what stage the client has a problem if something goes wrong.
- The name of the bot.
- The company the bot is attached to.
- Delete the bot.
|
|
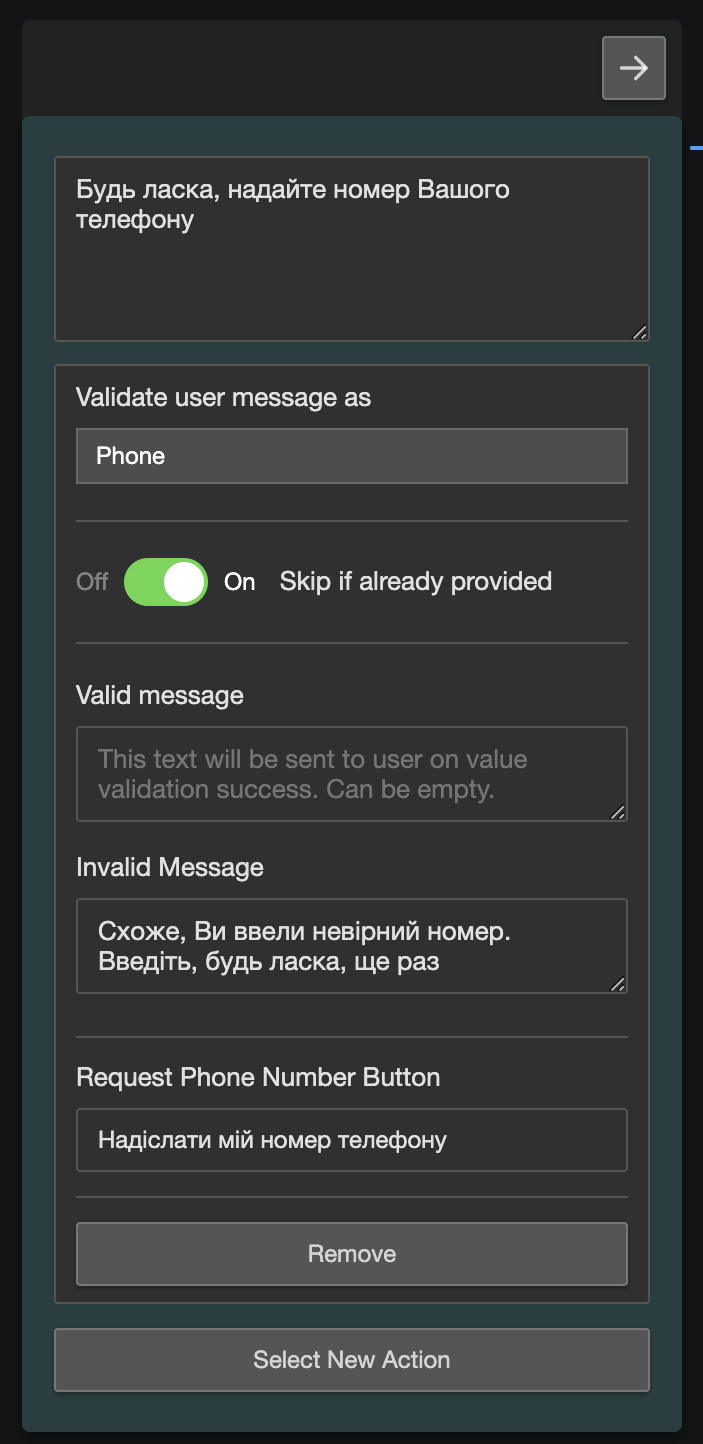
2.3. Customer data inquiry
A fundamental part of user experience is Request User Info, which will help identify users in internal databases. An agent can request a phone number or email.
|
3. Bot Integration
After creating and configuring the bot, the agent should connect it to the chatbot in the messenger and the Euphoric system itself.
3.1. Creating a bot in messenger
The connection between the messenger and qBot is established with the help of authentication tokens. Each messenger has its own system for creating such tokens.
3.2. Telegram
To create a bot in Telegram, search for @BotFather and start a new dialogue with the bot. Pay attention to the bot login. There should be a checkmark next to the bot name. This indicates the authenticity of BotFather. The bot will provide the information needed to create a new chatbot. For convenience, you should write down the code of the token as well as the link to the chatbot in an easily accessible place.
3.3. Viber
Viber has a special bot creation kit. It can be found here.
3.4. WhatsApp
WhatsApp has a more strict bot creation policy. The company, just like Viber, has a closed API, which means a bot can only be created via WhatsApp Business API. It is available through two WhatsApp partners: Twilio и Mfms.
4.5. QBot & Euphoric integration
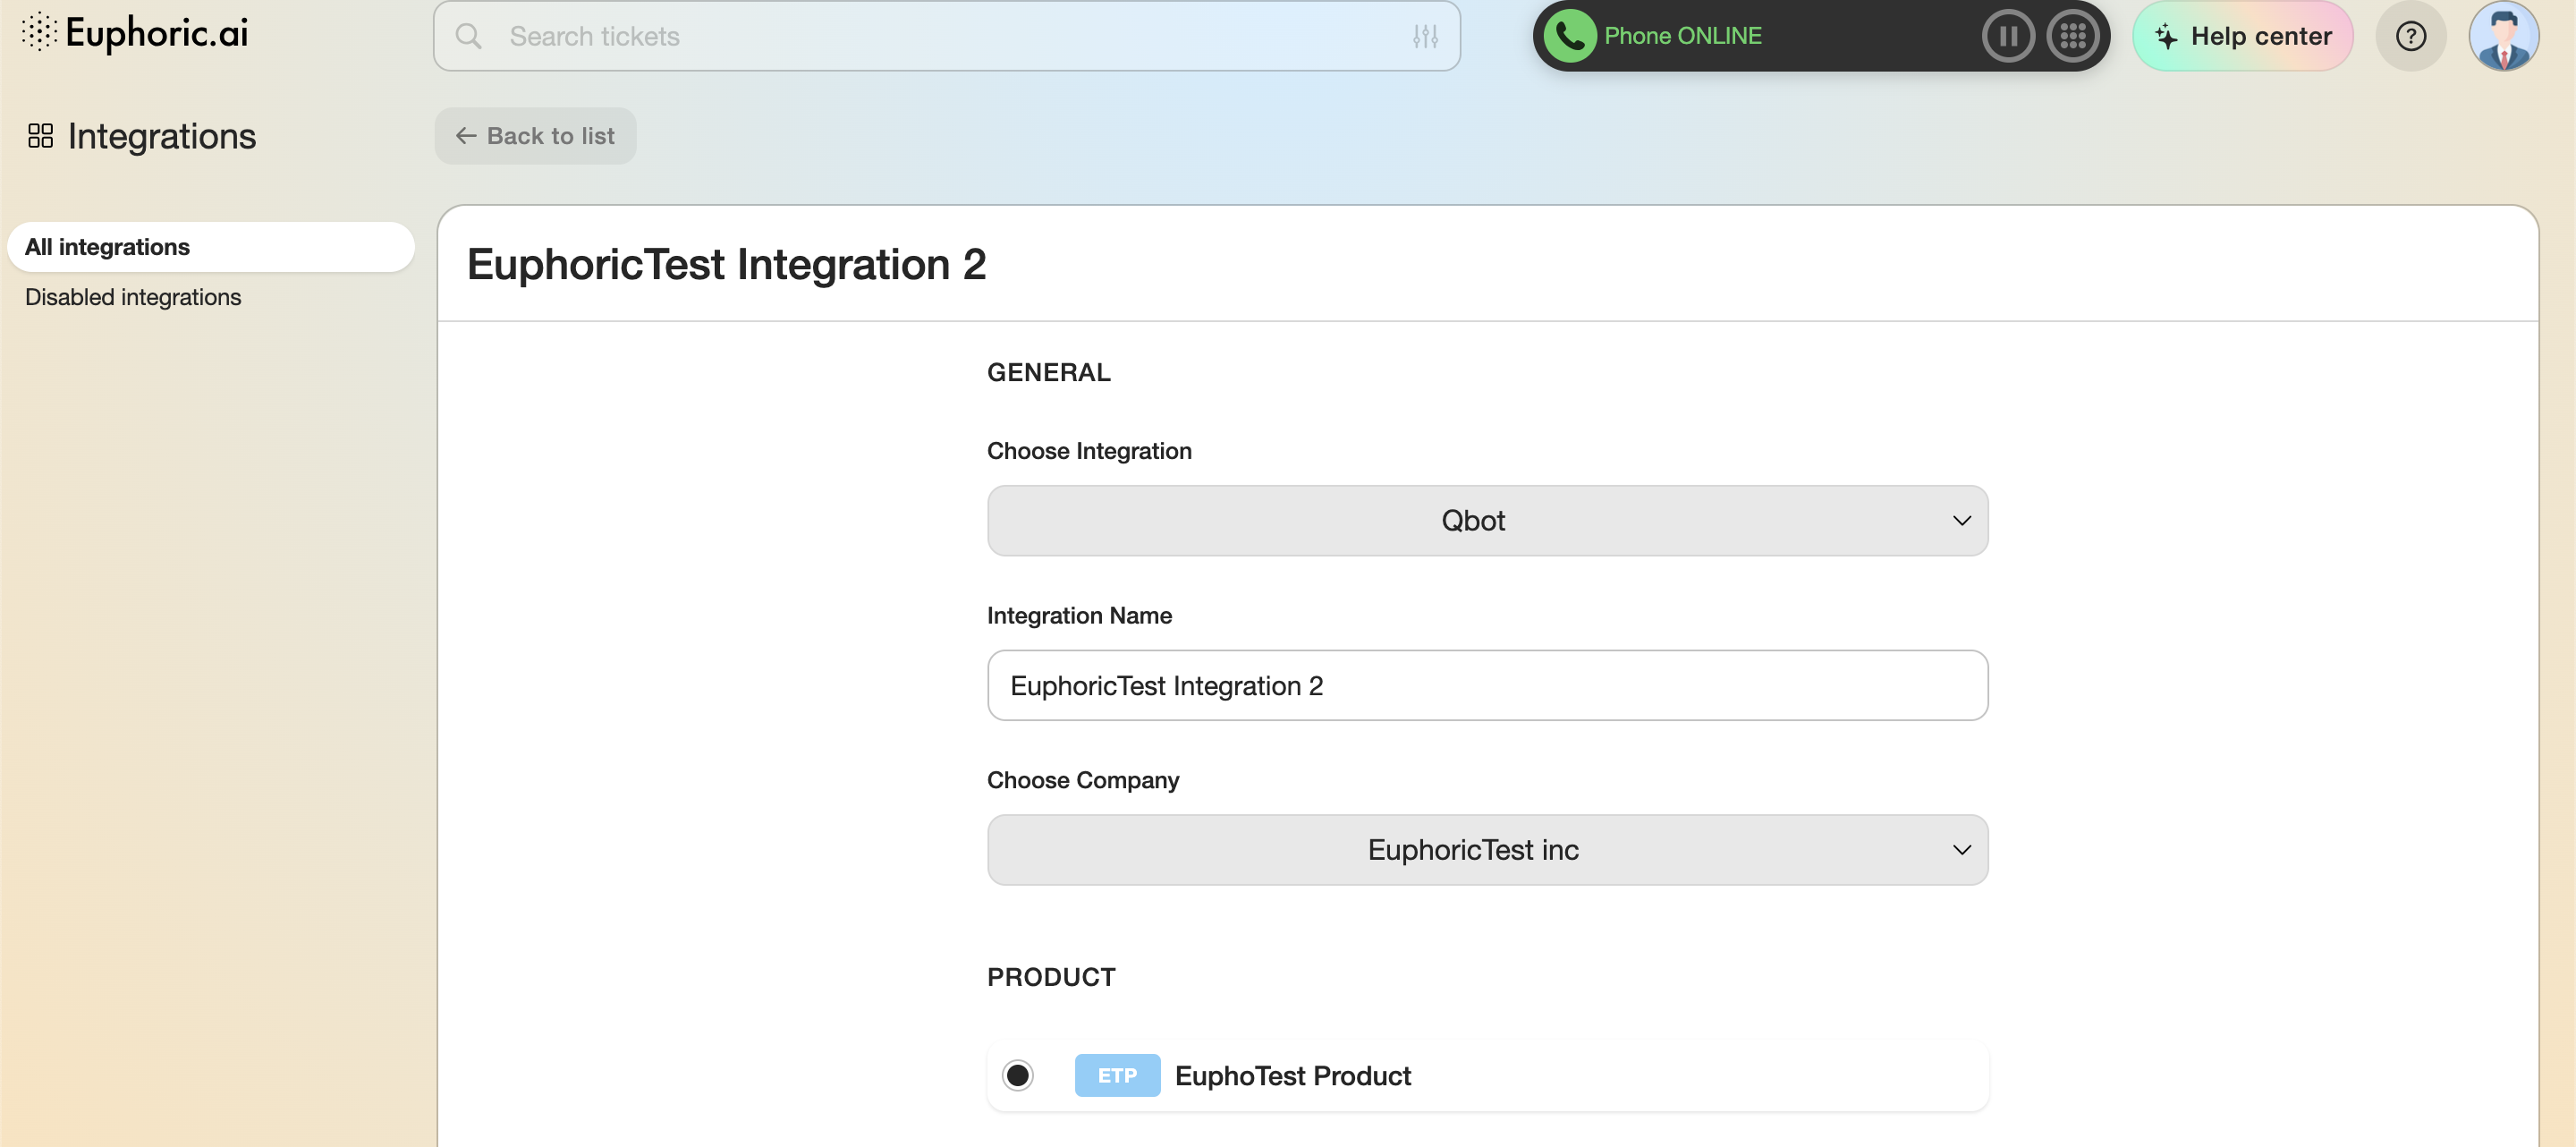
The last step is integrating QBot with Euphoric and setting up webhook.
You can create a new product for subsequent integration in advance. Then, in the Integrations section, create a new integration. Specify the QBot type in the type of integration.

Then, at the end of the list of integrations settings, in the Token field, enter the token generated for the chatbot by Telegram/Viber/WhatsApp and select the appropriate messenger and enter QBot ID in the Bot ID field.
Bot ID can be viewed in the browser address bar when editing a Q-bot (as seen in the screenshot in 2.2: Bot settings).
The address will be displayed in the following way: https://qbotbuilder.supportyourapp.com/bot/17
The number at the end of the address is the Bot ID.
After clicking the Save button, Euphoric will create a webhook. The bot integration is complete.
Now you can test the chatbot connection in the messenger.
Token and Messenger/Bot ID are the required fields for correct chatbot integration with Euphoric.